

Fix Your Front Rack: Why Your Elbows Drop and How to Correct It
Why Your Front Rack Is Sabotaging Your Big Lifts
The symptom is familiar: the elbows look strong at setup, then dip as the bar descends. In the bottom of a front squat, the chest dumps forward. In the catch of a clean, the bar rolls away from the shoulders and the recovery becomes a fight. The athlete often blames the wrists, but the visible failure is usually happening farther up the chain.
A front rack is not created by forcing the hands into an extreme position. It is created when the thoracic spine can stay extended, the shoulders can elevate and rotate appropriately, the elbows can rise, and the forearms can accept the remaining wrist angle without pain. Repeated wrist-twisting stretches may temporarily change sensation, but they will not solve a restriction in the lats or a rigid upper back. A technical breakdown from Catalyst Athletics similarly emphasizes that mobility limitations throughout the shoulder girdle and upper back create compensations throughout the kinetic chain.
When the rack collapses, the bar moves forward and the torso follows. That shifts work away from the quads, hips, and actively braced trunk and toward passive spinal structures. The answer is not more random stretching. The answer is a coach-led process: observe the fault, test the thoracic spine and shoulders, screen the wrists, prime the corrected positions, then reinforce them with a manageable load. Move well before moving fast, especially when the bar is heavy enough to expose every weak link.
The Biomechanical Cost of Dropping Your Elbows
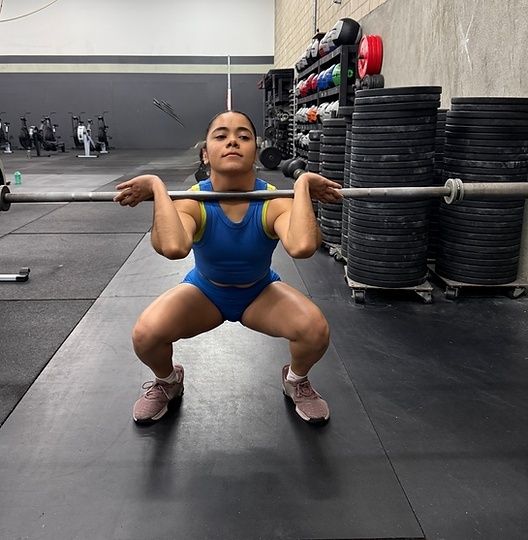
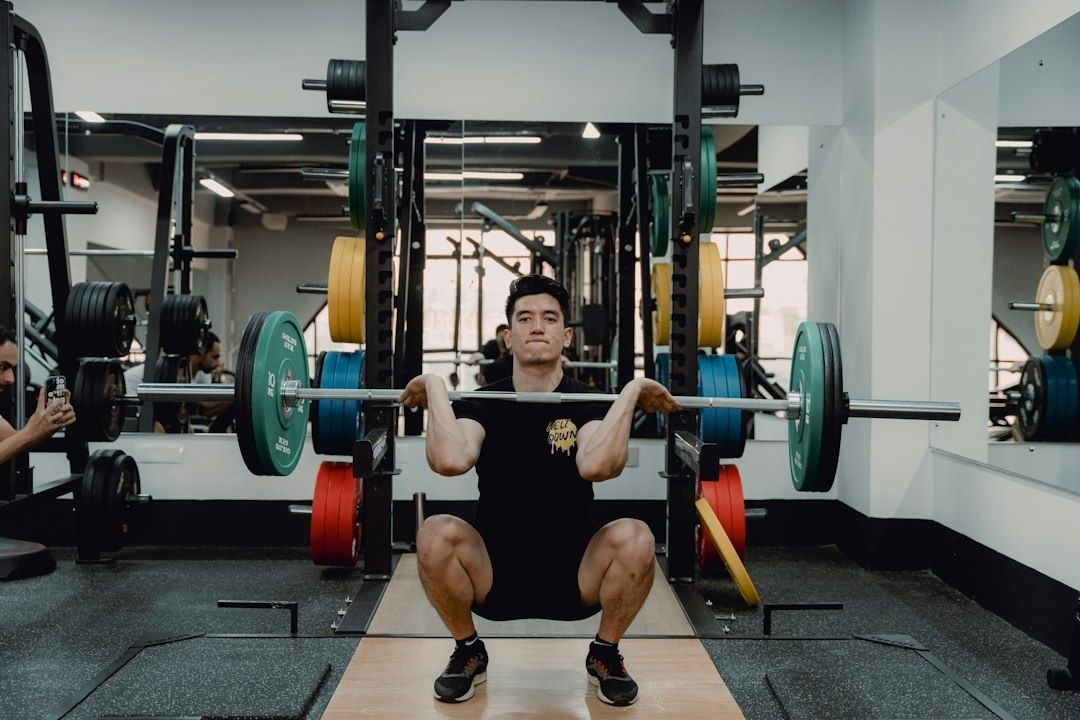
High elbows do more than make a front squat look cleaner. They create the anterior deltoid shelf that supports the bar and help keep the bar path close to vertical. When the elbows stay elevated, the bar rests across the shoulders and upper chest, allowing the athlete to maintain a relatively upright torso while the legs produce force. When the elbows fall, the shelf disappears. The bar begins to roll forward, and the athlete must lean forward to keep it from falling.
That forward lean changes the physics of the lift. The farther the bar moves in front of the hips and spine, the longer the external moment arm becomes. The trunk muscles must generate more force to prevent flexion, while the lumbar spine experiences greater demand from the anterior load. The issue is not that every forward inclination causes injury, nor that front squats are automatically risk-free. The issue is that an uncontrolled change in trunk angle under load reduces the margin for error.
A study examining abdominal bracing during front and back loaded squats describes preemptive abdominal contraction as a strategy that can increase trunk stability and intra-abdominal pressure. The full biomechanical discussion is available in the peer-reviewed squat loading research. The study page may display a Checking your browser message before the full text loads. Bracing does not replace mobility, but it helps the athlete keep the rib cage and pelvis organized while the legs move. If the rack collapses, breathing and pressure often deteriorate at the same time.
- Elbow drop: the shoulder shelf becomes less secure and the bar moves forward.
- Chest collapse: the spinal moment arm increases and the trunk must work harder to resist flexion.
- Pressure loss: the athlete exhales or loses rib cage control while trying to recover the bar.
- Technical cascade: the hips rise early, the knees may shift back, and the clean catch or squat ascent becomes less efficient.
This is why the front squat is such an honest assessment tool. It exposes limitations that a back squat can sometimes hide behind a more forgiving bar position. The goal is not to force an artificially vertical torso. The goal is to maintain the strongest position available while keeping the bar centered over the middle of the foot and the trunk actively organized.
Anatomy of the Rack: Pinpointing Your Weak Link
Three regions deserve immediate attention when elbows consistently fall: the thoracic spine, the latissimus dorsi, and the forearm and wrist complex. Each can create a similar-looking fault, but the correction differs. A thoracic restriction may prevent the chest from staying proud. A stiff lat may prevent the upper arm from reaching the required position. A genuine wrist limitation may make the clean grip uncomfortable even when the shoulder and upper back are functioning well.
| Potential restriction | What it limits | Common compensation | Useful first response |
|---|---|---|---|
| Thoracic spine | Active extension and upper-back stability | Chest collapse and forward bar drift | Thoracic extension and braced positional work |
| Latissimus dorsi | Shoulder elevation and external rotation | Elbow drop, rib flare, or lumbar overextension | Banded lat distraction with controlled breathing |
| Forearm flexors and wrist | Wrist extension and clean-grip tolerance | Hand pain, altered grip, or excessive finger strain | Gentle wrist work, straps, and progressive exposure |
Thoracic kyphosis is not automatically a problem. The key distinction is between a passive rounded position and active thoracic extension under load. The athlete needs enough upper-back control to keep the sternum and elbows rising without flaring the ribs or arching aggressively through the low back. If the upper back cannot contribute, the lumbar spine often tries to create the appearance of an upright torso.
The lats attach to the humerus and influence shoulder motion. When they are stiff, shoulder elevation and external rotation can become difficult, especially when the elbows must rise while the hands remain near the shoulders. The body may respond by dropping the elbows, flaring the ribs, or extending the lumbar spine. Wrist pain is therefore frequently the victim, not the cause. If symptoms persist, worsen, or include numbness, sharp pain, or loss of strength, evaluation by a licensed medical professional is the right next step.
The 3-Step Self-Assessment Protocol
Run these tests before loading a barbell. The purpose is not to chase arbitrary flexibility numbers. The purpose is to compare sides, identify the first restriction in the chain, and see whether the problem changes when the spine and shoulder are placed correctly.
- Test thoracic rotation and extension. Sit with the hips stable, cross the arms over the chest, and rotate through the upper back without twisting the pelvis. Then stand with the back against a wall and practice gentle thoracic extension while keeping the ribs controlled. If rotation is limited on one side or extension causes immediate lumbar arching, the upper back may be the primary restriction.
- Test shoulder flexion with the lats challenged. Kneel at a bench, place the elbows or hands on the surface, and hold a dowel while slowly allowing the shoulders to move overhead. Keep the ribs down and avoid creating motion by hyperextending the low back. Tightness through the side of the torso, armpit, or triceps that blocks elevation points toward an upstream shoulder restriction.
- Screen wrist extension separately. Place the palm or fingertips on a flat surface and gently assess wrist extension without forcing the joint. Compare both sides. If the wrist is comfortable during the shoulder tests but painful only at end range, wrist mobility may contribute. If the wrist is painful, swollen, or structurally blocked, do not force a clean-grip position.
Interpret the results immediately. If thoracic extension improves the rack, prioritize the upper back. If the bench lat stretch reproduces the exact elbow-drop sensation, address the lats and shoulder elevation. If both tests are acceptable but the wrist remains painful, use straps or a modified grip while the wrist is assessed. Straps are a training tool, not a failure. They can let the athlete practice the correct shelf without demanding a painful hand position.
Pre-Load Priming Drills for an Unshakable Shelf
Priming should be brief and specific. Five focused minutes can prepare the positions without turning the warm-up into a second workout. Begin with controlled foam roller thoracic extensions. Place the roller across the upper back, support the head, and extend gently over the roller while exhaling to keep the ribs from flaring. Follow with several slow breaths in a braced position, expanding around the sides and back of the rib cage rather than lifting the shoulders.
- Foam roller extensions: perform controlled repetitions through the upper back, not aggressive lumbar arching.
- Banded lat and triceps distractions: anchor a band overhead, place the arm in the rack pattern, and let the band assist shoulder elevation while the ribs stay down.
- Zombie squats: cross the arms in front of the chest and squat slowly, keeping the torso tall. These expose whether the athlete can maintain position without relying on the hands.
- Front-rack holds: use an empty bar or light load, establish the shelf, and hold for short intervals while breathing behind the brace.
Use the drills to create access, then immediately practice the skill. Mobility without reinforcement fades quickly. After the lat and thoracic work, perform several front-rack holds, partial squats, or light clean pulls with a deliberate elbow cue. Keep the load low enough that the shelf remains stable. Confidence is earned through preparation and repeatable positions, not through forcing a heavy set on a restricted joint.
Training equipment also deserves disciplined handling. Shared rollers, benches, bands, bars, and platforms collect sweat and skin contact throughout the day. Wipe surfaces according to gym policy, keep personal towels separate from communal equipment, and do not place clean gear on visibly contaminated surfaces. Public health protocols, including facility hygiene guidance published by the Centers for Disease Control and Prevention, emphasize cleaning high-touch surfaces to remove soil and organic matter before applying disinfectants, using approved sanitizing agents according to their stated contact times, and maintaining consistent facility sanitation schedules. State-specific facility requirements are also available through the Office of the Revisor of Statutes. The principle remains universal: clean first, disinfect correctly, and follow manufacturer dwell times to maintain a hygienic training environment.
Lock In Your Setup and Own Every Rep
A collapsing front rack is rarely fixed by attacking the wrist alone. Start upstream. Assess thoracic extension, shoulder elevation, lat stiffness, and wrist tolerance in that order. Then use targeted drills to open the required range while maintaining rib and pelvic control. The objective is an active shelf that remains secure during the descent, the catch, and the first demanding inch of the ascent.
Before the next clean or front squat session, dedicate five focused minutes to thoracic extensions, banded shoulder distractions, zombie squats, and light front-rack holds. Keep the elbows high, the chest proud, and the trunk braced without excessive rib flare. Scale the load whenever technique begins to unravel. When the position is prepared and practiced, the bar no longer has to be chased. It can be received, supported, and driven with purpose.